Top of the morning to you! It's Tuesday, which means that it's time to share a project created for Topflight Stamps! But, not only is it Tuesday, it's St. Patrick's Day, so I'm sharing three cards with some seriously cute nutty aviator squirrels from AALL and Create's Nutty Squirrel Clear Stamp Set.


Topflight Products Used:
Clouds Die Set by Joy Crafts (used to make masks)
Other Products Used:
Cryogen White Curious Metallic Cardstock
Classic Green and Classic Blue Cardstock by Bazzill Basics Paper®
Really Rainbow 6x6 Patterned Paper Pad by Lawn Fawn®
Removable ID Labels by Avery®
Tuxedo Black Memento™ Ink by Tsukineko®
Copic® Markers:
Squirrel Fur: E50, E51, C0, C1, C2, C3, C4, C6
Squirrel Noses: E04, RV9
Squirrel Mouth: E04, RV42, RV93
Scarves and Parachute: G02, G03, G05, G16, G19, G29
Helmets and Goggles: G43, G46, G82, G75, Y23, 26
Plane: G20, G21, G24, G28
Clouds: B60, RV0000, RV000, BV0000, C00, C0, C1
Blue Simply Sweet™ RubOns by Doodlebug Designs Inc.™
Class A'Peel™ Stickers by Stampendous®
Retired, ancient Sentiments 2 Stamp set by Purple Onion
Stamping Platform
STAY-tion™ by Wendy Vecchi/Ranger
Acetate
Dimensional Tape
Shamrock Confetti Sequin Stuff
Instructions:
- Cut blue cardstock to 5.5" x 8.5", score in half, and fold to form an A2 card. Set aside.
- Repeat step #1 with green cardstock to create two A2 cards. Set aside.
- Cut two pieces of patterned paper from the Rainbow pad to 5.25" x 4". Edge both sheets with Midnight Black Prism ink.
- Cut an 8.5" x 11" piece of Cryogen White cardstock in half to form two image panels.
- Use Memento ink to stamp the Pilot and Parachutist squirrels towards the top of each panel.
- Stamp both squirrels again onto the ID Label Paper to create masks. Fussy-cut, and adhere atop their counterparts on the image panel.
- Use the two smallest of the Clouds dies to die-cut the ID Label Paper to make cloud-shaped masks.
- Adhere the cloud masks as desired on the Parachutist image panel.
- Using the two darkest shades of the Ombre Blue Prism pad, sponge blue ink over the masked images and the clouds on both image panels. You'll note that dye inks pick up some shimmer when sponged onto Cryogen White Metallic cardstock. Nifty!
- Randomly sponge Pink Jellybean Prism ink onto the Parachutist image panel.
- Lift all masks and retain for another use.
- Color all images with Copic markers.
- Use alphabet rub-ons to add the sentiment to the plane's banner.
- Trim both image panels and edge with Midnight Black ink.
- Adhere the Pilot image panel onto the rainbow patterned paper, then adhere it to the blue card.
- Mat the Parachutist image panel onto green cardstock cut slightly larger, adhere to rainbow patterned paper, and adhere to one of the reserved green cards.
- Use Memento ink to stamp the sentiment onto one of the rainbow patterned paper sheets.
- Die-cut with a flag label die and edge with Midnight Black Prism ink.
- Adhere to the Parachutist card to finish it.
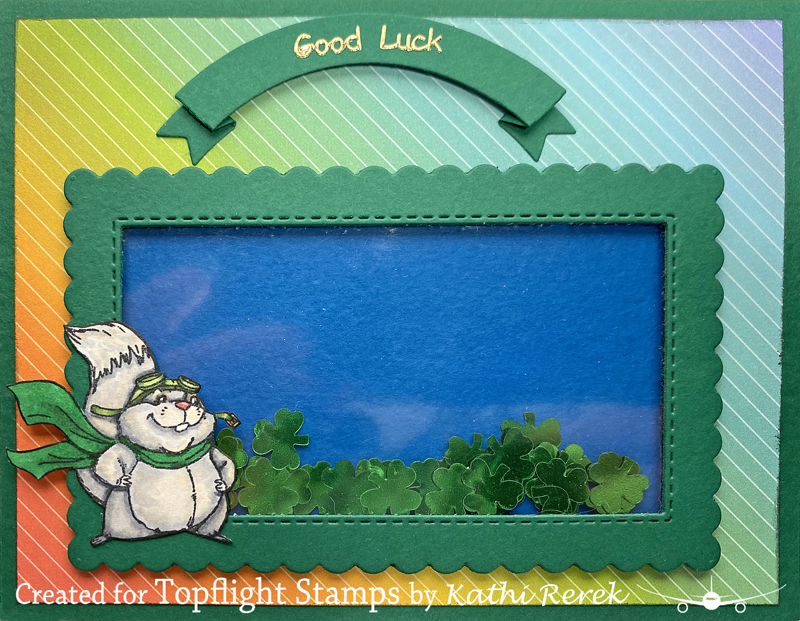
- Stamp the Posing Parachutist onto a small piece of Cryogen White cardstock.
- Fussy-cut the image, color with Copic markers, and edge with a dark marker.
- Use the smaller of the Scalloped Rectangle Frame dies to cut green cardstock.
- Adhere acetate over the window.
- Add dimensional foam adhesive around the opening to create a well.
- Dump in some shamrock shaped confetti sequin thingies. Accidentally add a strand or two of white cat fur.
- Seal the aperture with blue cardstock cut slightly smaller than the edge of the die-cut.
- Cut a piece of rainbow patterned paper to 5.25" x 4" and edge with Midnight Black Prism ink.
- Adhere the patterned paper to the other green card.
- Adhere the shaker element.
- Adhere the colored Posing Parachutist as shown.
- Use the Curved Banner Die to cut green cardstock.
- Adhere the sentiment sticker, then adhere the banner to the card to finish it up!
Thanks for visiting today!
These are so cute!
ReplyDelete