Sunday, June 18, 2017
Happy Father's Day Pop!
My brother-in-law calls my father-in-law "Pop", which is the inspiration for this card which features Frantic Stamper's brand new Soda Pop die.
Summer Carnival Fun is the theme of Frantic Stamper's June 2017 release. There are 25 new precision cutting dies and eight new stamps/stamp sets included in this exciting new release! Frantic Stamper, a fabulous online paper crafting store, also has its own wonderful line of precision cutting dies and clear stamps.
White cardstock was die-cut three times with the Soda Pop die, then colored with Copic markers to look like cola and orange soda.
Patterned paper from the Mellow 6x6 pad (Basic Grey) was layered. Rope patterned Washi tape (Little B) was placed over the seams between the patterns, then the three Soda Pop Bottles were adhered.
White cardstock was die-cut with the Typewriter Alphabet Upper Case (Impression Obsession) and adhered to the striped paper below the Soda Pop Bottles.
White and rust colored cardstock were die-cut with label dies (Spellbinders). The white cardstock was kept in the label and sponged with Distress ink. "Happy Father's Day" was stamped using the Sentiments II stamp set (Purple Onion Designs). The sentiment was adhered to the card front, which was then adhered to the card.
Thanks for visiting today!
Tuesday, June 13, 2017
Gnome Fishing!
Oh gno! It's time for another gnome pun. Since Father's Day is coming up rather quickly, I decided that the Fishing Gnome from the Gnome Sheet (I Brake for Stamps) would be the perfect image for a card! This fabulous gnome is one of NINE (9) gnomes and a plethora of mushrooms on that sheet. Please gnote that this sheet is a great bargain!
The Fishing Gnome was stamped with Tuxedo Black Memento ink (Imagine Crafts) and colored with Copic markers. The image panel was die-cut with one of the dies from the A2 Card Creator Nestabilities die set (Spellbinders).
Old patterned paper from the Mellow collection (Basic Grey) was layered. A set of the Fancy Tags dies (Spellbinders) was used to die-cut white and patterned brown cardstock. Bon-Bon Simply Sweet rub-ons (Doodlebug) were used to add the sentiment.
I Brake for Stamps has a huge and varied collection of rubber stamps that you ought to check out right now. Just so you know, I Brake for Stamps ships internationally!
Click on my badge below to be whisked over to I Brake for Stamps to check out all of the goodies! Best of all, if you buy something, you can get a 10% discount off of your purchase if you use this code: SAVE10KATHI
Thanks for visiting today!
Monday, June 12, 2017
What's Up?
This month the Stampotique Design Team is pleased to be collaborating with Eileen Hull's Design Team. We were supplied die-cuts from Eileen Hull's wonderful line of Sizzix dies and were to use them in conjunction with Stampotique's stamps.
You can probably tell that my card was inspired by movie "Up!". Skull Balloons (Arwen McCullen) were stamped multiple times with Tuxedo Black Memento ink (Imagine Crafts), colored with Copic markers, fussy-cut, and edged with a black marker. The plethora of Skull Balloons were set aside while I set to work with the house die-cut.
Owl with Wings was stamped twice with Tuxedo Black Memento ink, then trimmed so that the eyes would fit behind the house's windows. The Owl's eyes and the backgrounds were colored with Copic markers and set aside to watch over the Skull Balloons.
Alpha Background was stamped with Brick Red Distress Oxide ink Ranger), then the letters that I needed for my sentiment were punched with my handy-dandy Small Rectangle Paper Shaper punch (EK Success).
I initially sponged pink and grey Archival inks onto the house die-cut, but the paper ended up pilling. Luckily Carbon Black and Titanium White Media Fluid Acrylic (MFA) paints (DecoArt) rescued the house. The paint was heat set, reapplied, then heat set again. Actually, the pilling might have caused one of those "happy accidents" because the house gained a bit more age and texture. The windows, roof ruffles, chimney, and door were also painted with Media Fluid Acrylic (MFA) paints.
When the paint was dry, Neverending Wall, Small was stamped onto the house with Watering Can Archival ink (Ranger), then dried with a heat gun. The house was assembled, the Alpha Background sentiment was adhered, and dimensional foam tape was added to the reverse.
I found some cloudy patterned blue cardstock in my stash, which was cut to serve as my card front. Black thread was adhered to the back of each Skull Balloon, then the Skull Balloons were adhered to the card front with dimensional foam adhesive squares. The house was adhered over the balloons' thread strings and a silver metallic pearl was added to the door to act as a door knob.
The card front was edged with my beloved Black Soot Distress ink (Ranger), then adhered to a blue card.
Thanks for visiting today!
Here's my first card that features Skull Balloons (Arwen McCullen), Neverending Wall, Small (Arwen McCullen), Alpha Background (Arwen McCullen), Owl with Wings (Jo Capper-Sandon) with the House Pocket Thinlits set (Eileen Hull/Sizzix).
Owl with Wings was stamped twice with Tuxedo Black Memento ink, then trimmed so that the eyes would fit behind the house's windows. The Owl's eyes and the backgrounds were colored with Copic markers and set aside to watch over the Skull Balloons.
Alpha Background was stamped with Brick Red Distress Oxide ink Ranger), then the letters that I needed for my sentiment were punched with my handy-dandy Small Rectangle Paper Shaper punch (EK Success).
I initially sponged pink and grey Archival inks onto the house die-cut, but the paper ended up pilling. Luckily Carbon Black and Titanium White Media Fluid Acrylic (MFA) paints (DecoArt) rescued the house. The paint was heat set, reapplied, then heat set again. Actually, the pilling might have caused one of those "happy accidents" because the house gained a bit more age and texture. The windows, roof ruffles, chimney, and door were also painted with Media Fluid Acrylic (MFA) paints.
When the paint was dry, Neverending Wall, Small was stamped onto the house with Watering Can Archival ink (Ranger), then dried with a heat gun. The house was assembled, the Alpha Background sentiment was adhered, and dimensional foam tape was added to the reverse.
I found some cloudy patterned blue cardstock in my stash, which was cut to serve as my card front. Black thread was adhered to the back of each Skull Balloon, then the Skull Balloons were adhered to the card front with dimensional foam adhesive squares. The house was adhered over the balloons' thread strings and a silver metallic pearl was added to the door to act as a door knob.
The card front was edged with my beloved Black Soot Distress ink (Ranger), then adhered to a blue card.
Thanks for visiting today!
Friday, June 9, 2017
Enjoy the Ride!
Summer Carnival Fun is the theme of Frantic Stamper's June 2017 release. There are 25 new precision cutting dies and eight new stamps/stamp sets included in this exciting new release! Frantic Stamper, a fabulous online paper crafting store, also has its own wonderful line of precision cutting dies and clear stamps.
The Large Carousel Horse was die-cut several times from white cardstock. The body, mane, tail, blanket, garland, flowers, and leaves were all colored with Copic markers. The hooves and eye were coated with several layers of Clear Gelly Glaze pen (Sakura) to make them shiny and dimensional.
Silver metallic cardstock from the Metallic Stack (DCWV) was die-cut with the Large Carousel Horse's stirrups, the bit, and the bridle dies. Shiny black textured cardstock was die-cut with the saddle die. Gold metallic cardstock from the Metallic Stack was die-cut with the Large Carousel Horse carousel pole and "Enjoy" die.
A piece of blue polka-dotted patterned paper from the Bold and Bright Double Dot 6x6 pad (Bo-Bunny) was cut, then matted with a piece of leftover gold cardstock.
The Large Carousel Horse was assembled on the Double Dot paper and the matted image panel was adhered to blue cardstock (Bazzill Basics). The "Enjoy" sentiment was adhered. You'll note that I die-cut one of the flowers from the Large Carousel Horse die set to cut gold metallic cardstock. I used the flower to dot the "j" in "Enjoy". The image panel was matted with gold cardstock, then adhered to a blue card.
Thanks for visiting today!
Here's my second card for my Frantic Stamper guest designer gig. It features the Large Carousel Horse die set and the "Enjoy" die.
The Large Carousel Horse was die-cut several times from white cardstock. The body, mane, tail, blanket, garland, flowers, and leaves were all colored with Copic markers. The hooves and eye were coated with several layers of Clear Gelly Glaze pen (Sakura) to make them shiny and dimensional.
Silver metallic cardstock from the Metallic Stack (DCWV) was die-cut with the Large Carousel Horse's stirrups, the bit, and the bridle dies. Shiny black textured cardstock was die-cut with the saddle die. Gold metallic cardstock from the Metallic Stack was die-cut with the Large Carousel Horse carousel pole and "Enjoy" die.
A piece of blue polka-dotted patterned paper from the Bold and Bright Double Dot 6x6 pad (Bo-Bunny) was cut, then matted with a piece of leftover gold cardstock.
The Large Carousel Horse was assembled on the Double Dot paper and the matted image panel was adhered to blue cardstock (Bazzill Basics). The "Enjoy" sentiment was adhered. You'll note that I die-cut one of the flowers from the Large Carousel Horse die set to cut gold metallic cardstock. I used the flower to dot the "j" in "Enjoy". The image panel was matted with gold cardstock, then adhered to a blue card.
Thanks for visiting today!
Wednesday, June 7, 2017
Flowers!
This week's challenge at Stampotique Designer's Challenges is "Flowers!" Here's the blurb about the challenge!
"Let's see your favorite flowers this week!"If you'd like the chance to win your choice of $30 worth of Stampotique stamps, you should play along with this challenge. Visit Stampotique Designers Challenge blog and be sure to read the rules so that you'll have the chance to win that great prize!!! Remember to check to see the deadline for all of this month's Stampotique Designers Challenge blog!
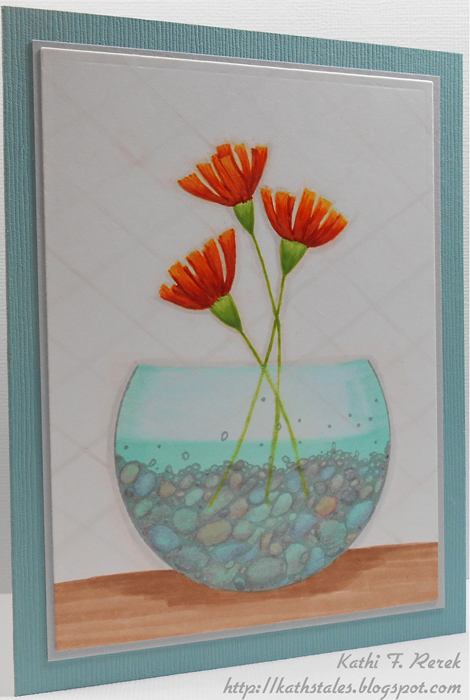
Here's my card with the wonderful new Microscopic (France Papillon) and Prairie Flowers (Terri Richardson).
I wanted to make the image look like a round vase, which was done by covering the top of the Microscopic stamp with Removable Scotch Tape®. The stamp was inked with London Fog Memento ink (Imagine Crafts), the tape was removed, and the image was stamped.
Likewise, I wanted to use just the flowers from the Prairie Flowers stamp, so strips of Removable Scotch Tape® were placed over the frame around the flowers and the stamp was inked with Dandelion Memento ink, the tape was removed, and the Prairie Flowersimage was stamped so that the stems went into the "vase".
All images were colored with Copic markers, which were also used to create the background around the flower vase.
The image panel was die-cut with one of the dies from the A2 Card Creator Nestabilities die set (Spellbinders), matted on grey cardstock, and adhered to a aqua/bluish card.
Retrospectively, I should have added more flowers to the vase, but I didn't want to mess with success! I know that I'll use this card design again, so there's always next time!
Thanks for visiting today!
Tuesday, June 6, 2017
Make a Wish!
Here's a card with The Queen, one of the fabulous Rick St. Dennis rubber stamps available at I Brake for Stamps.
The Queen was stamped with Tuxedo Black Memento ink (Imagine Crafts) and colored with Copic markers. The image panel was die-cut with one of the dies from the Crea-Nest-Lies XXL Tag #6 (CREAlies). The image panel was kept in the die, so that the floor could be added. Milled Lavender Distress ink (Ranger) was sponged over the die and onto the image panel. The image panel was removed from the die, then Gold Stardust Glitter pen (Sakura) was added to star on the The Queen's wand, radiating from her fingers, and from the moon on her headdress. Clear Stardust Glitter pen was used t add sparkle to the gemstones on her dress. Black Spica Glitter pen (Copic) was used to add a touch of sparkle to the buttons on her sleeves. When the glitter ink was dry, several layers of Clear Gelly Glaze pen (Sakura) was used to add dimension and shine to the moon on the Queen's headress, her dagger, and the star on her wand.
Patterned papers, from old 6x6 pads, were selected to match the Queen's outfit then die-cut with the one of the dies from the Crea-Nest-Lies Extreme Labels #6. The patterned papers were layered, then adhered to green cardstock which had been die-cut with a slightly larger die. A sparkly holographic foil sticker was adhered over the seam, then the The Queen image panel was adhered.
White cardstock was scored, folded, and die-cut with the largest of the Crea-Nest-Lies Extreme Labels #6. The matted tag-shaped card front was adhered and a Chit-Chat sentiment sticker (Idea-ology) was adhered to finish the card.
I Brake for Stamps has a large selection of exclusive Rick St. Dennis rubber stamps plus a huge and varied collection of rubber stamps that you ought to check out right now. Click on my badge below to be whisked over to I Brake for Stamps to check out all of the goodies! Best of all, if you buy something, you can get a 10% discount off of your purchase if you use this code: SAVE10KATHI!
Saturday, June 3, 2017
Stay Cool!
I have some good news! I'm honored and delighted to be guest designing at Frantic Stamper for the next few months! Frantic Stamper, a fabulous online paper crafting store, also has its own wonderful line of precision cutting dies and clear stamps.
Summer Carnival Fun is the theme of Frantic Stamper's June 2017 release. There are 25 new precision cutting dies and eight new stamps/stamp sets included in this exciting new release!
White cardstock was die-cut with the Soda Pop die, then colored with Copic markers. Solid and checkered patterned paper from the French Country collection (Graphic 45) was die-cut with the Stitched Rounded Squares die set. The checkered patterned paper die-was trimmed and layered atop the solid blue paper. The Soda Pop die-cuts were adhered to the the blue Stitched Rounded Square and a shadow was added with a Copic marker.
Summer Carnival Fun is the theme of Frantic Stamper's June 2017 release. There are 25 new precision cutting dies and eight new stamps/stamp sets included in this exciting new release!
Here's the first card as a Frantic Stamper guest designer. It features new Soda Pop die, the Stitched Rounded Squares die set, and the "Stay Cool" sentiment die.
Red cardstock was die-cut with the "Stay Cool" die, then adhered atop the yellow Stitched Rounded Square.
Patterned paper from the On the Boardwalk collection (Graphic 45) was cut to form the card front, then adhered to a yellow card. The two die-cut panels were adhered to finish the card.
Thanks for visiting today!
Subscribe to:
Posts (Atom)