Solar White Classic Crest Cardstock by Neenah Papers
- Create an A6 card from Avalanche Textured Cardstock. Set aside.
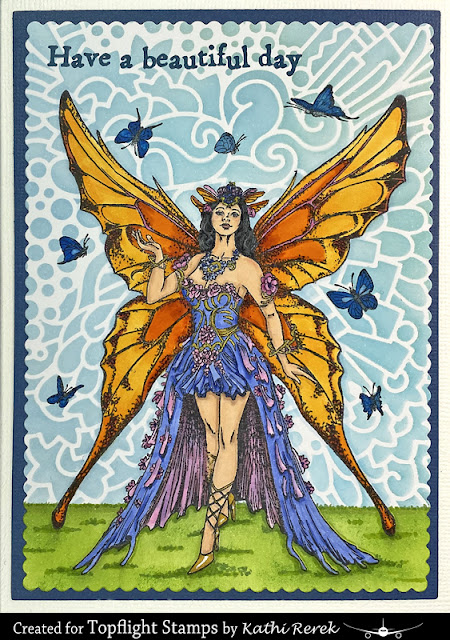
- Use Tuxedo Black Memento Ink by Imagine Crafts/Tsukineko to stamp the Fairy Queen from the Fairy Queen of Hearts Clear Stamp Set 1101 twice — once onto a cardstock panel and once onto repositionable sticker paper.
- Use Copic markers to color the Fairy Queen.
- Use a C1 and a B21 Copic marker to outline the image.
- Fussy-cut the sticker paper version of the Fairy Queen and place it atop the colored counterpart on the image panel.
- Place a ruler horizontally where the back of the skirt is at its longest.
- Brush Mown Lawn Distress Ink (Copic-friendly) over the ruler and the masked image to create a horizon line.
- Randomly brush horizontal lines of Mown Lawn Distress ink along the bottom portion of the panel.
- When done, brush a Twisted Citron Distress Ink overtop, blending a you go.
- Remove the ruler and cover grassy background with low-tack tape or a piece of paper.
- Use magnets or low-tack tape to secure the Profusion Stenci over the image panel.
- Brush Summer Sky Memento Ink (Copic-friendly) over the stencil and the masked image onto the image panel.
- Use the largest scalloped die from the Card Passe Partout Rectangle Die Set to cut the image panel.
- Remove the mask and the tape from the die-cut image panel.
- Move the image panel die-cut back onto the base of the stamping platform and secure with magnets.
- Position the butterfly stamps from the Fairy Queen of Hearts Clear Stamp Set 1101 facedown around the Fairy Queen.
- Press the platform's lid onto the back of the stamps, lift the platform's lid, ink the stamps with Nocturne VersaFine Clair Ink by Imagine Crafts/Tsukineko, and stamp.**
- Color the butterflies with markers.
- Use a gold Stardust Glitter Pen to add a touch of shimmer to the Fairy Queen's headdress, armbands, and sash.
- Use a White Gelly Roll Gel pen to add highlights to her heels.
- Place the image panel die-cut back onto the base of the stamping platform and secure with magnets.
- Position the "Have a Beautiful Day" sentiment stamp from the Everyday Sentiments Clear Stamp Set 666 facedown on the top of the image panel as shown.
- Press the platform's lid onto the back of the stamp, lift the platform's lid, ink the stamp with Twilight VersaFine Clair Ink, and stamp. Re-ink and stamp again if necessary to attain a good impression.
- Use the largeest plain rectangle die from the Card Passe Partout Rectangle Die Set to cut navy cardstock.
- Use the navy die-cut to mat the image panel.
- Adhere the matted image panel to a white A6 card.
- I have a few miscellaneous alcohol ink markers that I purchased when I was first exploring them as a coloring medium. I found the Prismacolor ones to be overly fragrant and never could find a decent stock of the Shinhan Touch Markers. I use these markers when I don't want to risk damaging or contaminating my beloved Copic markers.
- I used VersaFine Clair Ink to stamp the butteflies since they're tiny and very detailed. I suppose I could have tried to use Memento ink and then color with Copics, but I didn't feel like risking it after I finished coloring the Fairy Queen.
- Since perfection is overrated, one of my butterflies is upside down. Oopsy.


