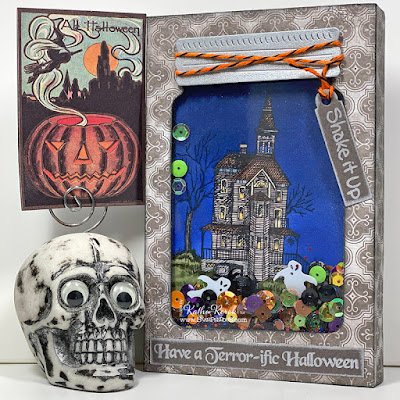
I'm definitely in Halloween mode and decided to create a shaker card using Stampendous!' wonderful WindowRama Dome Jar Shaker Die Set with the new Vintage Victorian Rubber Stamp and the Shake It Up Perfectly Clear Stamp Set. As usual, the shaker is overfilled and the image is a little wonky, but those adjectives describe me as well. So there's that.
Here's a front view of the card.
Here's a view showing the side and that once again, I've got sequins stuck where they don't belong. Oh well. Perfection is overrated.
Stampendous Products Used:
* This cardstock weight paper is great for coloring with Copic markers, especially when using a glass mat under it.
Other Products Used:
Copic® Markers:
Roof: E15, E27
Shingles: E70, E71
Window Frames/Woodwork: E81
Windows: YR31
Car: C3, C6, C7
Grass: G85, G94, G99
Tree: W5
Midnight Magic 6x6 Pad by Recollections®
Dusk Cardstock by Bazzill Basics Paper®
Blueprint Sketch, Chipped Sapphire Distress® Ink by Tim Holtz® for Ranger Industries
Fresh Snow Hybrid Ink by Paper Trey
Tag Die by Spellbinders®
Trick or Treat, Pumpkin Spice, Nebula Sparkle Blends by Doodles Paper Playground
Spider Sequinish Thingies by Recollections
Baker's Twine
Removable ID Labels by Avery®STAY-tion by Wendy Vecchi for Ranger Industries
Stamping Platform
Clear acetate or acrylic saved from packaging
Black Foam Tape by Craft Fancy
Black Foam Squares by Scrapbook Adhesives® by 3L
Sookwang Tape, Red Liner Tape, or strong liquid adhesive.
Instructions:
Instructions:
- Place a piece of white mixed media paper onto the stamping platform and secure with magnets.
- Position the Vintage Victorian rubber stamp on the paper, press the lid onto the stamp, and lift.
- Use Memento ink to stamp the image onto the paper to create the image panel.
- Repeat #3, this time stamping onto a piece of Removable Label paper to create a mask.
- Fussy-cut the label version and place it atop its counterpart on the image panel.
- Remove the image panel from the stamping platform. Remove stamp and clean. Or not. Whatever floats your boat.
- Place the image panel onto the STAY-tion and secure with magnets.
- Sponge or brush Blueprint Sketch Distress ink over the panel starting at the ruler and working your way up from the bottom to the top of the image panel.
- Sponge Chipped Sapphire Distress ink over the panel, concentrating the ink towards the top and along the sides.
- Remove the image panel from the STAY-tion.
- Lift the mask and color the house, car, tree, and grassy hill. Set aside.
- Use the base of the WindowRama Dome Jar Shaker Die Set to cut patterned paper for the front of the card and Dusk cardstock for the back
- For the front of the card, fold the patterned paper backwards on the scoreline on both sides of the die-cut.
- For the back of the card, fold the green cardstock forwards on the scoreline on both sides of the die-cut.
- Use the jar-shaped die to cut the die-cut front.
- Use the lid die to cut silver cardstock for the jar's lid.
- Adhere acrylic over the window on the reverse of the card front.
- Add foam tape around the perimeter of the jar-shaped window opening over the acrylic.
- Tap the acrylic and the sides of the foam tape with an anti-static bag. Do this several more times than I did or do it more vigorously. I dunno.
- Add the shaker contents and some white cat fur to the well formed by the foam tape. I added too much. Clearly I haven't figured out how much to add. Oh well.
- Adhere the image panel to the the back of the card front to seal the shaker.
- Adhere the front panel of the card to the back panel of the card using strong tape or liquid adhesive.
- Place a piece of the Dusk cardstock onto the stamping platform and secure with magnets.
- Position both sentiments on the cardstock, press the lid onto the stamp, and lift.
- Ink the sentiments with white ink, stamp, and repeat if necessary to achieve good coverage.
- Cut the "Shake" sentiment with the tag die.
- Trim the Halloween sentiment.
- Edge both sentiment pieces with white ink.
- Color the black and white baker's twine with an orange marker.
- Thread the twine through the hole in the tag, then wrap the twine around the silver jar lid die-cut.
- Adhere the jar lid and the tag sentiment to finish the card.
Thanks for visiting today!


its great!
ReplyDelete